Sunday, May 10, 2020
Logo project
tag brush
artist statement


Artist Statement: For this assignment, we were tasked with creating a unique tag brush in photoshop using the logo we created in illustrator. By Layering different paint blotch images and paint spray images over a uniquely cut out section of my logo the final product was created. I'd like to point out I used this greyish blue to create this export but the tag brush can be any color I decide. This was one of the cooler aspects of this project because I can customize the brush to be what I need for each project depending on the colors I've already used.
InDesign Tutorials
https://www.youtube.com/watch?v=mVW8AF2TMnw
https://www.youtube.com/watch?v=g-lm_rP79C4
https://www.youtube.com/watch?v=-YL2QSai9Ng&t=1s
These were 3 tutorials I found useful while learning InDesign.
https://www.youtube.com/watch?v=g-lm_rP79C4
https://www.youtube.com/watch?v=-YL2QSai9Ng&t=1s
These were 3 tutorials I found useful while learning InDesign.
Illustrator tutorials
https://www.youtube.com/watch?v=Kgmu8RwLi28
https://www.youtube.com/watch?v=3GzumUieDPY
https://www.youtube.com/watch?v=C0t1bMhKZ0Q
I found these tutorials very helpful in my learning of Adobe Illustrator.
https://www.youtube.com/watch?v=3GzumUieDPY
https://www.youtube.com/watch?v=C0t1bMhKZ0Q
I found these tutorials very helpful in my learning of Adobe Illustrator.
Sunday, May 3, 2020
Portfolio
Portfolio Blog.


Artist Statement:
First, I just wanted to say that the slides of the portfolio uploaded in a different order and blogger wouldn't let me adjust the order. It is crazy that we are at the end of the semester already. While it was a rough one with all that has been going on I was still impressed with how far I have come as an artist. Compiling all my work throughout the semester made me realize how much I had accomplished and improved. I enjoyed making the portfolio and it wasn't as hard as I thought it was going to be once I set up my layers in my template. From there it was keeping a consistent style and feel throughout. I am glad I got to take this class and am appreciative for what I was able to learn under the circumstances.
Thursday, April 23, 2020
InDesign Business Cards
Business Cards Artist Statement:
For our first project in InDesign we were tasked with creating three sets of unique business cards to use in conjunction with our logos we created. I wanted to stay consistent with my color scheme I used for my logo. So i used the swatches window to save the shades of blue and orange that I wanted to use throughout. I created layers for 6 pages of 3.5in height by 2in width. The layers were: Background, Art, Logo, and text. On each of these distinct layers I would create my styles for each business card and would have impressive control over how I wanted to color and line things up. I learned a few good uses for InDesign through this project and I feel confident as a beginner in the program.


For our first project in InDesign we were tasked with creating three sets of unique business cards to use in conjunction with our logos we created. I wanted to stay consistent with my color scheme I used for my logo. So i used the swatches window to save the shades of blue and orange that I wanted to use throughout. I created layers for 6 pages of 3.5in height by 2in width. The layers were: Background, Art, Logo, and text. On each of these distinct layers I would create my styles for each business card and would have impressive control over how I wanted to color and line things up. I learned a few good uses for InDesign through this project and I feel confident as a beginner in the program.
Autoscopy Project
Ronan Tattersall

Ronan Tattersall

Artist Statement:
For this autoscopy assignment we were tasked with taking an image of our face and creating something different entirely. I chose to take my head and put it in space as a floating god entity. The behind background i played with all the colors to get a tone i liked. Then I tried adding adjustment layers to all my elements which would give them a weird trippy spaced out feel. I put the ship from treasure planet in there for scale and for fun. This assignment showed me that Photoshop was not as complicated to get a beginners grip of. This helped me feel like i was more competent using the layers and adjustment layers. I threw my tag brush on there as a signature. The cool retro looking Saturn was my favorite part to edit. It was a lot of fun playing with a lot of color changes.
Tuesday, April 14, 2020
Propaganda Poster Illustrator

Somewhere project


Sunday, April 5, 2020
BW photo with Tag brush


ARTIST STATEMENT:
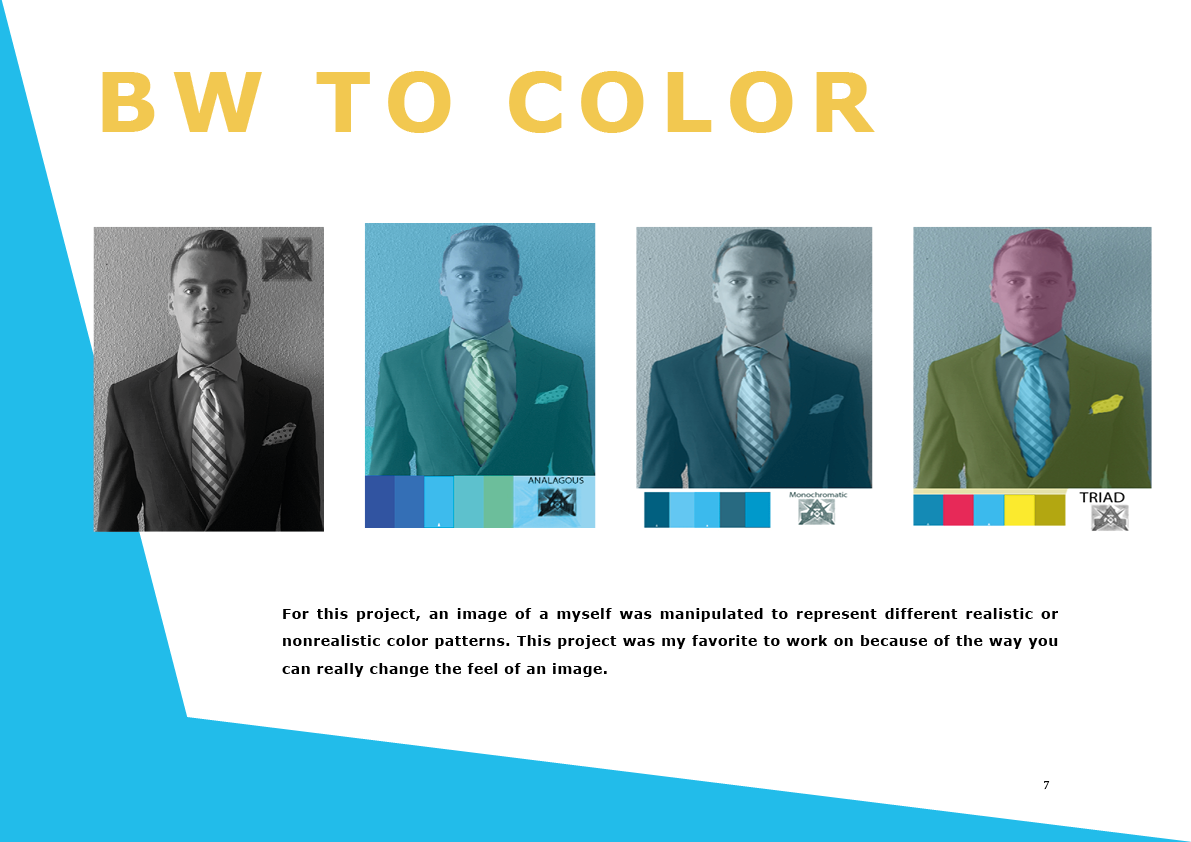
For this assignment we were tasked with stripping an image to greyscale in photoshop and then to recolor the image using an Adobe color theme. I liked this project as it took more time than I thought it would, it was a challenge to figure out all the masks and how neat they had to be. I learned from this project more than any other that patience is the key to the game. After many errors I was becoming frustrated but I got back down to the basics and I think as I worked I developed more and more into it. My favorite of the three is the monochromatic as I think that looks the cleanest.
Photoshop Tutorials
Here are three tutorials that helped me a great deal with my assignment:
1.
2.
3.

original

analagous

complimentary

compound

monochromatic

shades

triad
Artist Statement for BW Photoshop project:As this is my first experience in Photoshop, getting comfortable with the program is taking time. I found this project quite pleasant though as in my major I have already taken an editing class on color correction in DaVinci Resolve. It is always fun playing around with the colors because you can completely change the dynamic of an image. From the above images it is clear that the same picture could be many different times of day to more drastic color changes. I also feel like my knowledge of color themes was improved and I will not hesitate to take advantage of the color theme creator. The only issues I encountered during this process was getting comfortable with the program and learning the shortcuts and window names. After a couple of tutorials though it gets easier and easier. I'm looking forward to working more in Adobe Photoshop.
Sunday, February 23, 2020
Elephant Calligram

Artist Statement:
This piece of work was inspired by Calligram designs. Using Adobe illustrator, I outlined and traced an image of an elephant and worked to outline it with text. From there I moved to defining the features of the Elephants body to make it seem as if the words were just another form of line. This project posed a much greater challenge to me, I have never had experience with illustrator so this felt like swimming in the deep end. That being said I think I was able to complete the assignment to the best of my abilities. I always liked Elephants as a child because they were the biggest and most funny looking creatures I had ever seen. This inspiration worked well for this project because the outline of an elephant is very easy to point out and identify. No other creature really looks like them so even if the quality of this elephant is confusing because of the text, it is always recognizable as an elephant. That is what I was going for.
Tuesday, February 11, 2020
Canvas

Artist Statement:
This piece of work was inspired by cubism, a very interesting artistic style. I found a painting of a tree blowing in the wind, the beach air curling through the leaves. I loved the peacefulness of the tree, like it had been there for many years, accustomed to the harsh wind and sea air. I was reminded of ancient trees with spiritual purpose, that stood high in the mountains. The sacred type that has a aura of peace around it. While the image that inspired me was a tree on a beach, I wanted to create my own space that would still feel grand but have a modern element to it. The curves and lines in the background feel like pure space, a digital wind blowing through. One that could be very overpowering, yet a tree stands here, bristling in the wind, minding its own business. For the Colors, I picked this Blue and Yellow style because it provides a neat contrast, the highlights of purple adds just enough range to really bring it all together. I really enjoyed working on this and I am proud of the final product. I think the message of this piece is to remain calm and strong in the face of the unknown, just like the tree.
Inspiration:

Final Product:

My Project Code
////// Background
for (var yay=-1500; yay<canvas.height; yay+=7) {
var startX = 1000;
var startY = yay-2000;
var endX = canvas.width;
var endY = canvas.height;
var cpointX = yay+200;
var cpointY = -yay;
context.beginPath();
context.moveTo(startX, startY);
//context.lineTo(endX, endY);
context.quadraticCurveTo(cpointX, cpointY, endX, endY);
//context.closePath();
context.strokeStyle = "rgb(255,255,120)";
context.fillStyle = "rgb(255,255,150)";
context.fill();
context.lineWidth = 2;
context.stroke();
}
/////// BEZIER CURVE 1 on right side
for (var i=1; i<canvas.height; i+=10) {
var startX =-200;
var startY = i;
// starting point coordinates
var endX = 800;
var endY = i;
var cpoint1X = 650;
var cpoint1Y = 200;
var cpoint2X = i;
var cpoint2Y = 400;
context.beginPath();
context.moveTo(startX, startY); ///cpoint1Y
context.bezierCurveTo(cpoint1X, cpoint1Y , cpoint2X, cpoint2Y, endX, endY);
context.lineWidth = 1;
context.strokeStyle = "rgb(255,200,255)";
context.stroke();
}
/////// BEZIER CURVE 2 middle
for (var i=0; i<canvas.height; i+=10) {
var startX = -3000;
var startY = 900;
// starting point coordinates
var endX = i;
var endY = -2000;
var cpoint1X = 800;
var cpoint1Y = 1600;
var cpoint2X = 150;
var cpoint2Y = 800;
context.beginPath();
context.moveTo(startX, startY); ///cpoint1Y
context.bezierCurveTo(cpoint1X, cpoint1Y , cpoint2X, cpoint2Y, endX, endY);
context.lineWidth = 1;
context.strokeStyle = "rgb(100,210,255)";
context.stroke();
}
/////// BEZIER CURVE 3 left side
for (var i=0; i<canvas.height; i+=10) {
var startX = -500;
var startY = 1;
// starting point coordinates
var endX = -500;
var endY = 200;
var cpoint1X = 900;
var cpoint1Y = -200;
var cpoint2X = 2000;
var cpoint2Y = i;
context.beginPath();
context.moveTo(startX, startY); ///cpoint1Y
context.bezierCurveTo(cpoint1X, cpoint1Y , cpoint2X, cpoint2Y, endX, endY);
context.lineWidth = 1;
context.strokeStyle = "rgb(0,255,255)";
context.stroke();
}
////bezeir curve 4 left side
for (var i=0; i<canvas.height; i+=10) {
var startX = -250;
var startY = 800;
// starting point coordinates
var endX = -500;
var endY = 200;
var cpoint1X = 450;
var cpoint1Y = 2000;
var cpoint2X = 1000;
var cpoint2Y = i;
context.beginPath();
context.moveTo(startX, startY); ///cpoint1Y
context.bezierCurveTo(cpoint1X, cpoint1Y , cpoint2X, cpoint2Y, endX, endY);
context.lineWidth = .5;
context.strokeStyle = "rgb(64,224,208)";
context.stroke();
}
/////// BEZIER CURVE 5 in middle
for (var i=1; i<canvas.height; i+=10) {
var startX =400;
var startY = i;
// starting point coordinates
var endX = 400;
var endY = i;
var cpoint1X = 850;
var cpoint1Y = 400;
var cpoint2X = i;
var cpoint2Y = 200;
context.beginPath();
context.moveTo(startX, startY); ///cpoint1Y
context.bezierCurveTo(cpoint1X, cpoint1Y , cpoint2X, cpoint2Y, endX, endY);
context.lineWidth = 1;
context.strokeStyle = "rgb(64,224,208)";
context.stroke();
}
/////// BEZIER CURVE 6 in middle
for (var i=1; i<canvas.height; i+=10) {
var startX =i;
var startY = 400;
// starting point coordinates
var endX = i;
var endY = 400;
var cpoint1X = 1200;
var cpoint1Y = 100;
var cpoint2X = i;
var cpoint2Y = 100;
context.beginPath();
context.moveTo(startX, startY); ///cpoint1Y
context.bezierCurveTo(cpoint1X, cpoint1Y , cpoint2X, cpoint2Y, endX, endY);
context.lineWidth = 1;
context.strokeStyle = "rgb(255,255,255)";
context.stroke();
}
///triangle gradient
context.beginPath(); // begin a shape
context.moveTo(-10,615); // point A coordinates
context.lineTo(1050, 800); // point B coords
context.lineTo(400,300); // point C coords
context.closePath(); // close the shape
context.lineWidth = 15; // you can use a variable that changes wherever you see a number
context.lineJoin = "round";
context.strokeStyle = "rgba(53,153,255,190)"; // Reb Green Blue Alpha
context.stroke();
var trianglegrade = context.createLinearGradient(400,300,400,600);
trianglegrade.addColorStop(0, 'rgb(51,153,255)');
trianglegrade.addColorStop(.5,'rgb(51,200,200)');
trianglegrade.addColorStop(1,'rgb(51,255,255)');
context.fillStyle = trianglegrade; ///"rgba(205,255,255,1)";
context.fill();
///tree trunk
// starting point coordinates
var x = 370;
var y = 200;
// control point coordinates ( magnet )
var cpointX = canvas.width / 1 - 525;
var cpointY = canvas.height / 1 - 225;
// ending point coordinates
var x1 = 350;
var y1 = 450;
context.beginPath();
context.moveTo(x, y);
context.quadraticCurveTo(cpointX, cpointY, x1, y1);
context.lineWidth = 5;
context.strokeStyle = "rgb(153,76,0)";
context.stroke();
var x = 285;
var y = 200;
// control point coordinates ( magnet )
var cpointX = canvas.width / 1 - 580;
var cpointY = canvas.height / 1 - 200;
// ending point coordinates
var x1 = 400;
var y1 = 450;
context.beginPath();
context.moveTo(x, y);
context.quadraticCurveTo(cpointX, cpointY, x1, y1);
context.lineWidth = 5;
context.strokeStyle = "rgb(153,76,0)";
context.stroke();
///tree trunk base
var x = 417;
var y = 490;
var controlX = 375;
var controlY = 350;
var x1 = 275;
var y1 = 350;
var controlX1 = 300;
var controlY1 = 450;
var x2 = 370;
var y2 = 487;
context.beginPath();
context.moveTo(x, y);
context.quadraticCurveTo(controlX, controlY, x1, y1);
context.quadraticCurveTo(controlX1, controlY1, x2, y2);
context.fillStyle = 'rgb(153, 76, 0)';
context.fill();
context.lineWidth = 5;
context.strokeStyle = "rgb(153,76,0)";
context.stroke();
///tree trunk
var x = 275;
var y = 200;
var controlX = 235;
var controlY = 365;
var x1 = 350;
var y1 = 400;
var controlX1 = 310;
var controlY1 = 265;
var x2 = 380;
var y2 = 200;
context.beginPath();
context.moveTo(x, y);
context.quadraticCurveTo(controlX, controlY, x1, y1);
context.quadraticCurveTo(controlX1, controlY1, x2, y2);
context.fillStyle = 'rgb(153, 76, 0)';
context.fill();
context.lineWidth = 5;
context.strokeStyle = "rgb(153,76,0)";
context.stroke();
////tree leaves one
var x = 100;
var y = 200;
var controlX = 360;
var controlY = 40;
var x1 = 685;
var y1 = 150;
var controlX1 = 500;
var controlY1 = 215;
var x2 = 100;
var y2 = 200;
context.beginPath();
context.moveTo(x, y);
context.quadraticCurveTo(controlX, controlY, x1, y1);
context.quadraticCurveTo(controlX1, controlY1, x2, y2);
context.fillStyle = 'rgb(0, 128, 255)';
context.fill();
context.lineWidth = 5;
context.strokeStyle = "rgb(255,255,50)";
context.stroke();
////tree leaves two
var x = 150;
var y = 100;
var controlX = 385;
var controlY = 40;
var x1 = 685;
var y1 = 150;
var controlX1 = 400;
var controlY1 = 215;
var x2 = 150;
var y2 = 100;
context.beginPath();
context.moveTo(x, y);
context.quadraticCurveTo(controlX, controlY, x1, y1);
context.quadraticCurveTo(controlX1, controlY1, x2, y2);
context.fillStyle = 'rgb(51, 153, 255)';
context.fill();
context.lineWidth = 5;
context.strokeStyle = "rgb(255,255,80)";
context.stroke();
////tree leaves three
var x = 300;
var y = 50;
var controlX = 750;
var controlY = 100;
var x1 = 685;
var y1 = 150;
var controlX1 = 400;
var controlY1 = 175;
var x2 = 300;
var y2 = 50;
context.beginPath();
context.moveTo(x, y);
context.quadraticCurveTo(controlX, controlY, x1, y1);
context.quadraticCurveTo(controlX1, controlY1, x2, y2);
context.fillStyle = 'rgb(102, 178, 255)';
context.fill();
context.lineWidth = 5;
context.strokeStyle = "rgb(255,255,102)";
context.stroke();
////tree leaves four
var x = 450;
var y = 25;
var controlX = 750;
var controlY = 100;
var x1 = 685;
var y1 = 150;
var controlX1 = 485;
var controlY1 = 125;
var x2 = 450;
var y2 = 25;
context.beginPath();
context.moveTo(x, y);
context.quadraticCurveTo(controlX, controlY, x1, y1);
context.quadraticCurveTo(controlX1, controlY1, x2, y2);
context.fillStyle = 'rgb(153, 204, 255)';
context.fill();
context.lineWidth = 5;
context.strokeStyle = "rgb(255,255,35)";
context.stroke();
///rock 1
var centerX = 365;
var centerY = 485;
var radius = 35;
var startX = 300;
var startY = 200;
var startRadius = 200;
var endX = 400;
var endY = 300;
var endRadius = 200;
context.beginPath();
context.arc(centerX, centerY, radius, 0, 2*Math.PI, false);
var grd = context.createRadialGradient(startX, startY, startRadius, endX, endY, endRadius);
grd.addColorStop(0, 'rgb(0, 250, 255)');
grd.addColorStop(1, 'rgb(192,192,192)');
context.fillStyle = grd;
context.fill();
context.strokeStyle = 'rgb(128,128,128)'
context.stroke();
///rock 2
var centerX = 435;
var centerY = 480;
var radius = 35;
var startX = 300;
var startY = 200;
var startRadius = 200;
var endX = 400;
var endY = 300;
var endRadius = 200;
context.beginPath();
context.arc(centerX, centerY, radius, 0, 2*Math.PI, false);
var grd = context.createRadialGradient(startX, startY, startRadius, endX, endY, endRadius);
grd.addColorStop(0, 'rgb(0, 250, 255)');
grd.addColorStop(1, 'rgb(192,192,192)');
context.fillStyle = grd;
context.fill();
context.strokeStyle = 'rgb(128,128,128)'
context.stroke();
///rock 3
var centerX = 400;
var centerY = 500;
var radius = 35;
var startX = 300;
var startY = 200;
var startRadius = 200;
var endX = 400;
var endY = 300;
var endRadius = 200;
context.beginPath();
context.arc(centerX, centerY, radius, 0, 2*Math.PI, false);
var grd = context.createRadialGradient(startX, startY, startRadius, endX, endY, endRadius);
grd.addColorStop(0, 'rgb(0, 250, 255)');
grd.addColorStop(1, 'rgb(192,192,192)');
context.fillStyle = grd;
context.fill();
context.strokeStyle = 'rgb(128,128,128)'
context.stroke();
Wednesday, January 29, 2020
Monday, January 27, 2020
Digital Media #1
Hello, my name is Ronan, I am a Film Major currently in my Junior year. My family is from Yorkshire, England and while the culture was a massive part of my childhood, I only lived there for a short while at a young age. I was born in Jerusalem, Israel and have moved around a couple of times growing up in various states and countries. I hope that this class will finally give me the skills I feel I have been missing in programs such as photoshop and illustrator. While I have quite a bit of experience in other editing programs from my production courses, like non linear video editing, color correction and sound design. I have never had formal training for photoshop and illustrator, something that feels like a lot of people have today. Im 20 years old and have a passion for movies, I have been making them since I was young and I hope to make a career out of it. It is exciting to learn these new skills and add them to my repertoire. I believe everything you learn comes in handy and makes you a better more well rounded person, so I look forward to this opportunity.
Subscribe to:
Comments (Atom)